Summary: in this tutorial, we will introduce you to PL/SQL cursor. You will learn step by step how to use a cursor to loop through a set of rows and process each row individually.
Introducing to PL/SQL Cursor
When you work with Oracle database, you work with a complete set of rows returned from an SELECT statement. However the application in some cases cannot work effectively with the entire result set, therefore, the database server needs to provide a mechanism for the application to work with one row or a subset of the result set at a time. As the result, Oracle created PL/SQL cursor to provide these extensions.
A PL/SQL cursor is a pointer that points to the result set of an SQL query against database tables.
Working with PL/SQL Cursor
The following picture describes steps that you need to follow when you work with a PL/SQL cursor:
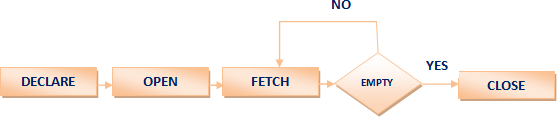
Let’s examine each step in greater detail.
Declaring PL/SQL Cursor
To use PL/SQL cursor, first you must declare it in the declaration section of PL/SQL block or in a package as follows:
CURSOR cursor_name [ ( [ parameter_1 [, parameter_2 ...] ) ]
[ RETURN return_specification ]
IS sql_select_statements
[FOR UPDATE [OF [column_list]];Code language: SQL (Structured Query Language) (sql)- First, you declare the name of the cursor
cursor_nameafter theCURSORkeyword. The name of the cursor can have up to 30 characters in length and follows the naming rules of identifiers in PL/SQL. It is important to note that cursor’s name is not a variable so you cannot use it as a variable such as assigning it to other cursor or using it in an expression. Theparameter1,parameter2… are optional elements in the cursor declaration. These parameters allow you to pass arguments into the cursor. TheRETURN return_specificationis also an optional part. - Second, you specify a valid SQL statement that returns a result set where the cursor points to.
- Third, you can indicate a list of columns that you want to update after the
FOR UPDATE OF. This part is optional so you can omit it in theCURSORdeclaration.
Here is an example of declaring a cursor:
CURSOR cur_chief
IS
  SELECT
    first_name, last_name, department_name
  FROM
    employees e
  INNER JOIN departments d ON d.manager_id = e.employee_id;Code language: SQL (Structured Query Language) (sql)
We retrieved data from employees and departments tables using the SELECTwith the INNER JOIN clause and set the cur_chief cursor to this result set.
Opening a PL/SQL Cursor
After declaring a cursor, you can open it by using the following syntax:
OPEN cursor_name [ ( argument_1 [, argument_2 ...] ) ];Code language: SQL (Structured Query Language) (sql)You have to specify the cursor’s name cursor_nameafter the keyword OPEN. If the cursor was defined with a parameter list, you need to pass corresponding arguments to the cursor.
When you OPEN the cursor, PL/SQL executes the SELECT statement and identifies the active result set. Notice that the OPENaction does not actually retrieve records from the database. It happens in the FETCHstep. If the cursor was declared with the FOR UPDATE clause, PL/SQL locks all the records in the result set.
We can open the cur_chiefcursor as follows:
OPEN cur_chief;Code language: SQL (Structured Query Language) (sql)Fetching Records from PL/SQL Cursor
Once the cursor is open, you can fetch data from the cursor into a record that has the same structure as the cursor. Instead of fetching data into a record, you can also fetch data from the cursor to a list of variables.
The fetch action retrieves data and fills the record or the variable list. You can manipulate this data in memory. You can fetch the data until there is no record found in active result set.
The syntax of FETCHis as follows:
FETCH cursor_name INTO record or variablesCode language: SQL (Structured Query Language) (sql)You can test the cursor’s attribute %FOUND or %NOTFOUND to check if the fetch against the cursor is succeeded. The cursor has more attributes that we will cover in the next section.
We can use PL/SQL LOOP statement together with the FETCHto loop through all records in active result set as follows:
LOOP
    -- fetch information from cursor into record
    FETCH cur_chief INTO r_chief;

    EXIT WHEN cur_chief%NOTFOUND;

    -- print department - chief
    DBMS_OUTPUT.PUT_LINE(r_chief.department_name || ' - ' ||
                         r_chief.first_name || ',' ||
                         r_chief.last_name);
  END LOOP;Code language: SQL (Structured Query Language) (sql)
Closing PL/SQL Cursor
You should always close the cursor when it is no longer used. Otherwise, you will have a memory leak in your program, which is not expected.
To close a cursor, you use CLOSEstatement as follows:
CLOSE cursor_name;Code language: SQL (Structured Query Language) (sql)And here is an example of closing the cur_chief cursor:
CLOSE cur_chief;Code language: SQL (Structured Query Language) (sql)A complete PL/SQL Cursor Example
The following is a complete example of cursor for printing a list of chief and name of departments as follows:
SET SERVEROUTPUT ON SIZE 1000000;
DECLARE
  -- declare a cursor
  CURSOR cur_chief IS
      SELECT first_name,
             last_name,
             department_name
      FROM employees e
      INNER JOIN departments d ON d.manager_id = e.employee_id;

  r_chief cur_chief%ROWTYPE;
BEGIN
  OPEN cur_chief;
  LOOP
    -- fetch information from cursor into record
    FETCH cur_chief INTO r_chief;

    EXIT WHEN cur_chief%NOTFOUND;

    -- print department - chief
    DBMS_OUTPUT.PUT_LINE(r_chief.department_name || ' - ' ||
                         r_chief.first_name || ',' ||
                         r_chief.last_name);
  END LOOP;
  -- close cursor cur_chief
  CLOSE cur_chief;
END;
/Code language: SQL (Structured Query Language) (sql)
PL/SQL Cursor Attributes
These are the main attributes of a PL/SQL cursor and their descriptions.
| Attribute | Description |
|---|---|
| cursor_name%FOUND | returns TRUEif record was fetched successfully by cursor cursor_name |
| cursor_name%NOTFOUND | returns TRUEif record was not fetched successfully by cursor cursor_name |
| cursor_name%ROWCOUNT | returns the number of records fetched from the cursor cursor_nameat the time we test %ROWCOUNT attribute |
| cursor_name%ISOPEN | returns TRUEif the cursor cursor_nameis open |
In this tutorial, you’ve learned how to use PL/SQL Cursor to loop through a set of rows with all necessary steps that need to be done including DECLARE, OPEN, FETCH and CLOSE.